

An Illustrated Guide to OAuth


OAuth was first introduced in 2007. It was created at Twitter because Twitter wanted a way to allow third-party apps to post tweets on users' behalf. Take a second to imagine designing something like that today. How would you do it? One way would just be to ask the user for their username and password. So you create an unofficial Twitter client, and present the user a login screen that says "log in with Twitter". The user does so, but instead of logging into Twitter, they're actually sending their data to you, this third-party service which logs into Twitter for them.

This is bad for a lot of reasons. Even if you trust a third-party app, what if they don't store your password correctly and someone steals it? You should never give your password to a third-party website like this.
Another way you might be thinking is, what about API keys? Because you're hitting Twitter's API to post data for a user, and for an API, you use API keys. But API keys are general. What you need is an API key specific to a user.

To solve these problems, OAuth was created. You'll see how it solves all these problems, but the crux of OAuth is an access token, which is sort of like an API key for a specific user. An app gets an access token, and then they can use that to take actions on the user's behalf, or access data for a user.
How OAuth works

OAuth can be used in a lot of different ways, one of the reasons it is so hard to understand. In this post, we’re going to look at a typical OAuth flow.
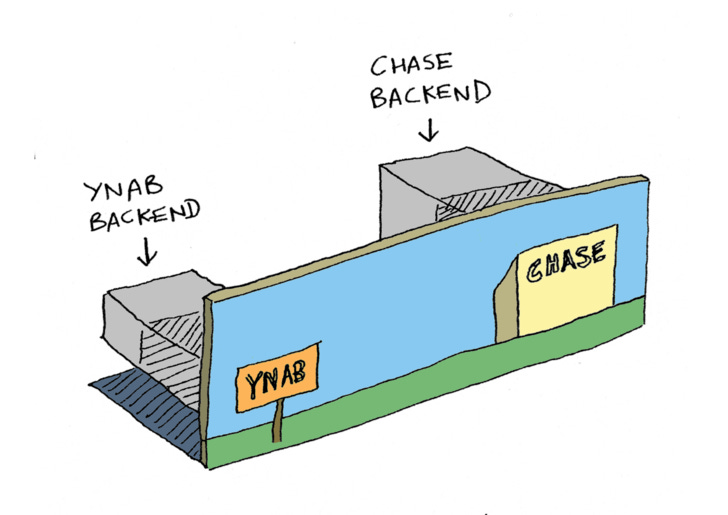
The example I'm going to use is YNAB. If you haven't used it, YNAB is like a paid version of Mint. You connect it to a bank account, and then it pulls all your transactions from that account, and shows them to you with very pretty charts. You can categorize your spending, and then it tells you for example, hey, you're spending too much on groceries. It helps you manage your finances. So, I want to use YNAB, and I want to connect it to Chase Bank, but I don't want to give it my Chase password. So instead, I'm going to use OAuth.
Let's look at the flow first, and then let's understand what's going on. We're actually going to look at the flow twice, because I think you need to look through an OAuth flow at least two times to understand what's going on.
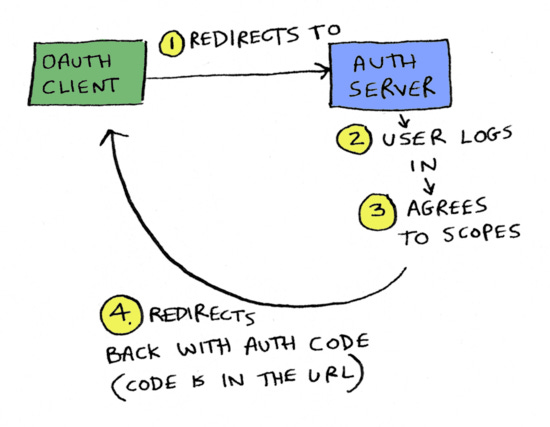
OAuth flow, take 1
So to start, I'm at YNAB, and I want to connect Chase as a source. The OAuth flow looks like this:
YNAB redirects me to Chase.
At Chase, I log in with my username and password.
Chase shows me a screen saying "YNAB wants to connect to Chase. Pick what accounts you want to give YNAB access to". It'll show me a list of all my accounts. Let's say I pick just my checking account, to give YNAB read access to this account, and hit OK.
From Chase, I'm redirected back to YNAB, and now, magically, YNAB is connected to Chase.

This is the experience from a user's perspective. But what happened there? What magic happened in the background, so that YNAB somehow has access to my data on Chase?
The end goal is to end up with an access token
Remember, the end goal of OAuth is for YNAB to end up with an access token, so it can access my data from Chase. Somehow, as I went through this flow, YNAB ended up with an access token. I'll spoil the surprise by telling you how it got the access token, and then I'll walk you through what happened in more detail.
A quick word on security
How does Chase give YNAB the access token? When you were redirected from Chase back to YNAB, Chase could have just added the access token in the URL. It could have redirected you back to a URL like this:
https://www.ynab.com/redirect?access_token=123and then YNAB would be able to get the access token.
BAD IDEA!!
An access token is supposed to be secret, but URLs can end up in your browser's history or some server logs, in which case it's easy for anyone to see your access token.
So Chase could technically redirect you back to YNAB with the access token in the URL, and then YNAB would have the access token. End of OAuth flow. But we don’t do it this way, because sending an access token in the URL is not secure.
When you were redirected from Chase back to YNAB, Chase sent YNAB an authorization code in the URL.
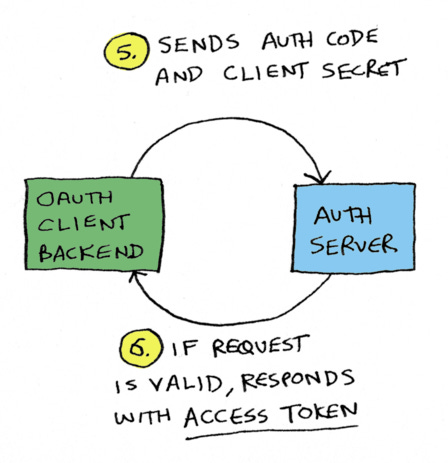
An authorization code is not an access token! Chase sends YNAB an authorization code, and YNAB exchanges the authorization code for an access token. It does this by making a backend request to Chase, a backend POST request over HTTPS, which means no one can see the access token.
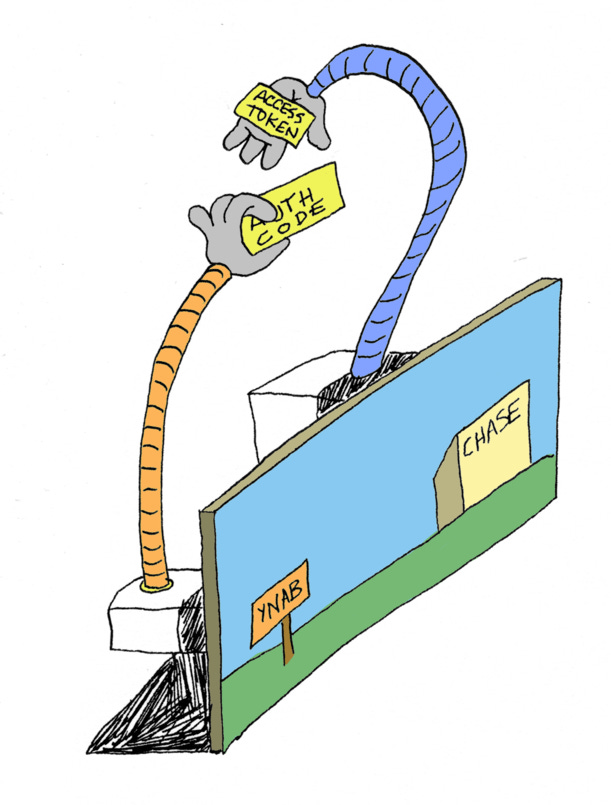
And then YNAB has the access token. End of OAuth flow. OAuth success.
Two parts of OAuth
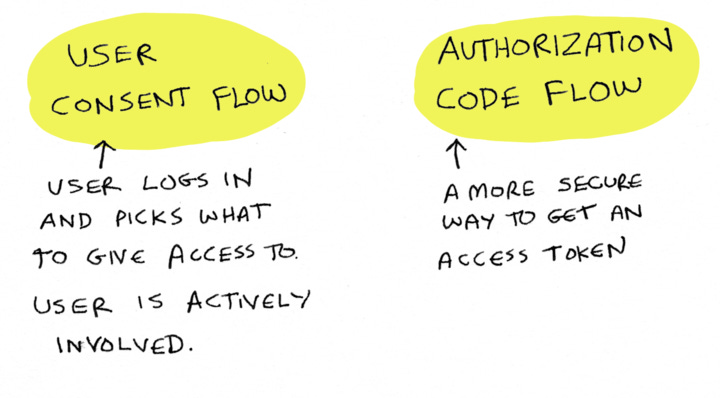
Let's talk about what we just saw. At a high level, there are two parts to an OAuth flow. The first is the user consent flow, which is where you, the user, log in and pick what to give access to. This is a critical part of OAuth, because in OAuth, we always want the user to be actively involved and in control.
The other part is the authorization code flow. This is the flow where YNAB actually gets this access token.
Let's talk about more details of exactly how this works. And let's also talk about some terminology, because OAuth has very specific terminology.
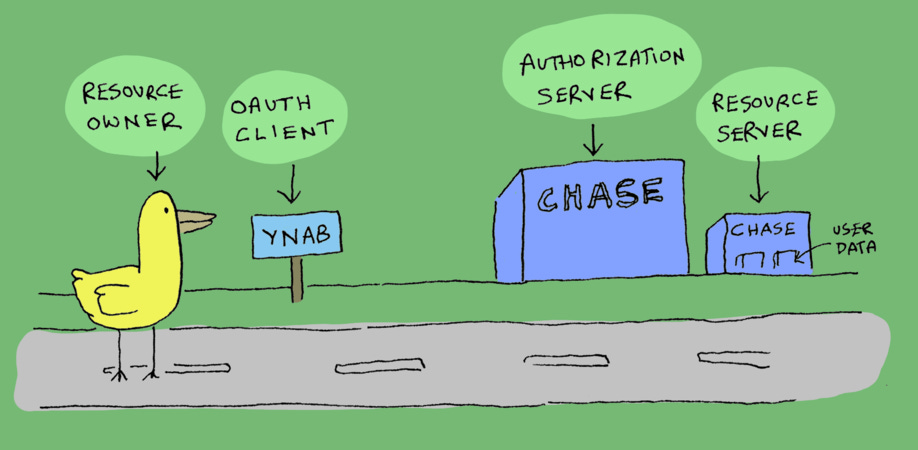
Instead of user, we say resource owner.
Instead of app, we say OAuth client or OAuth app.
The server where you log in is called the authorization server. The server where you get user data from is called the resource server (This could be the same as the authorization server).
On the authorization server, when the user picks what's allowed, those are called scopes.
I'll try to use that terminology, because you'll need to get familiar with it if you're going to read more OAuth documentation.
So let’s look at this high level again, with the new terms.
OAuth flow, take 2
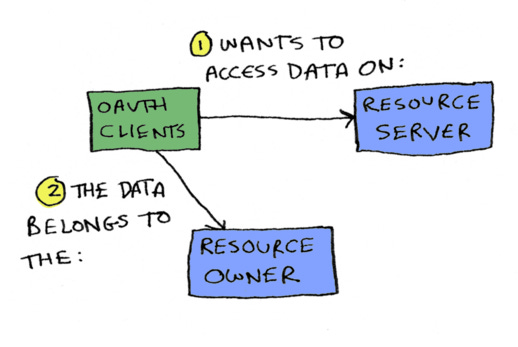
You have OAuth clients. An OAuth client wants to access data on a resource server, and the data belongs to the resource owner.
To do that, the OAuth client redirects to the authorization server. The user logs in, user agrees to scopes (what this token is allowed to access), and the user gets redirected back to the OAuth client with an authorization code in the URL.
On the back end, the OAuth client sends the authorization code and client secret (we'll talk about client secrets shortly) to the authorization server, and the authorization server responds with the access token.
That's the exact same flow, but using the new terminology we just discussed. Now let's talk specifics. We've seen what this flow looks like from the user's point of view, let's look at what it looks like from the developer's point of view.
Registering a new app
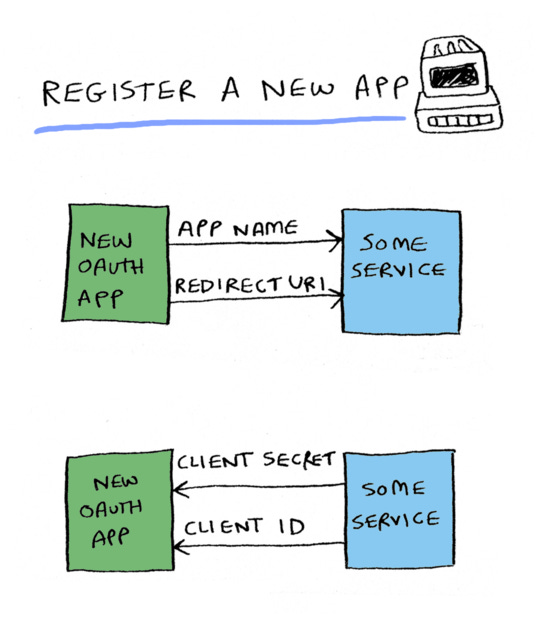
To use OAuth, you first need to register a new app. So for example, GitHub provides OAuth. If you want to create a new app for GitHub, you first register it. Different services require different types of data in the app registration, but every service will require at least
an app name, because when the user goes to GitHub, for example, GitHub needs to be able to say "Amazon Web Services is requesting read access to your repos and gists"
A redirect URI. And we'll talk about what that is shortly.
GitHub will respond with:
A client ID. This is a public ID that you'll be using to make requests
A client secret. You'll be using this to authenticate your request.
Awesome, you have registered your OAuth application. Let's say your app is YNAB, and one of your users wants to connect to Chase. So you start a new OAuth flow... your very first one!
Step one: You will redirect them to Chase's authorization server's OAuth endpoint, passing these parameters in the URL:
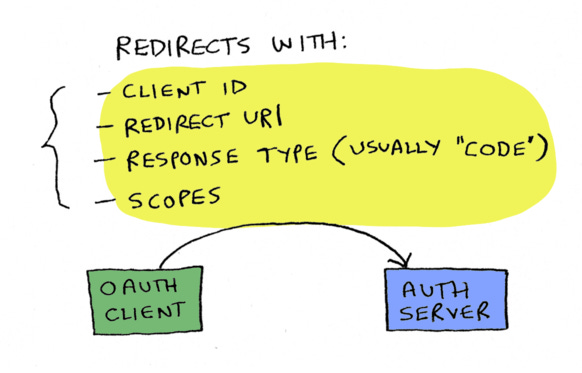
Client ID, which we just talked about.
The redirect URI. Once the user is done on Chase, this is where Chase will redirect them back to. This will be a YNAB url, since you're the YNAB app.
Response type, which is usually "code", because we usually want to get back an authorization code, not an access token, which is less secure.
Scopes. So what scopes are we requesting? i.e. what user data do we want to access?
This is enough information for the authorization server to validate the request and show the user a message like "YNAB is requesting read access to your accounts".
How does the authorization server validate the request? Well, if the client ID isn't valid, the request is invalid right away. If the client ID is valid, the authorization server needs to check the redirect URI. Basically, since the client ID is public, anyone could go get the YNAB client ID, and create their own OAuth flow that hits Chase, but then returns the user back to, let's say, evildude.com. But that's why when you register your app, you have to tell Chase what a valid redirect URI looks like. At that point, you would tell Chase that only YNAB.com URIs are valid, thus preventing this evildude.com scenario.
If everything is valid, the authorization server can use the client ID to get the app name, maybe the app icon, and then show a user consent screen.
The user will click which accounts they want to give YNAB access to, and hit okay.
Chase will redirect them back to the redirect URI that you gave, lets say ynab.com/oauth-callback?authorization_code=xyz.
Side note: you might be wondering, what is the difference between URI and URL? Because I'm kind of using both. Well, a URL is any website URL that we know and love. URI is more general. URL is a type of URI, but there are many other types of URIs.
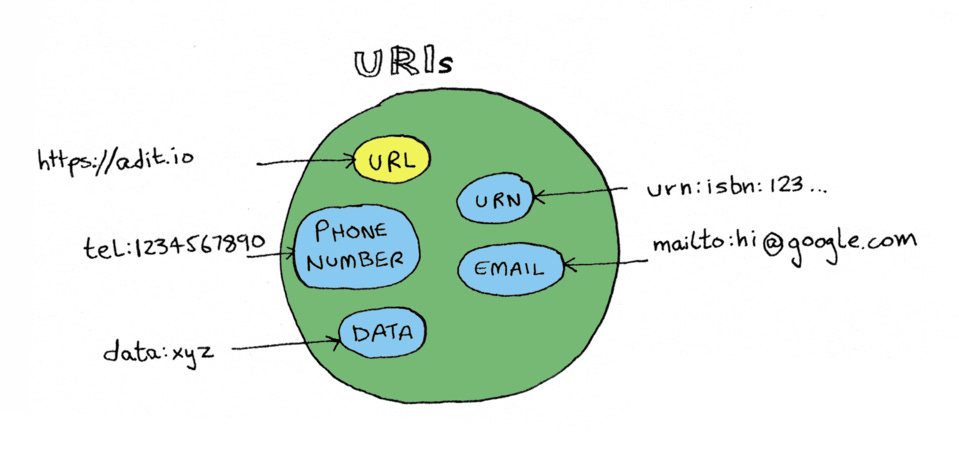
The reason I'm saying redirect URI instead of redirect URL is because mobile apps won't have a URL. They'll just have a URI, which is a protocol they have made up that might look something like
myapp://foobar. So if you're only doing web work, whenever you read URI, you can read it as URL. And if you're doing mobile work, you can read URI and know that yes, your use case is supported too.
So user is redirected back to ynab.com/oauth-callback?authorization_code=xyz, and now your app has an authorization code. You send that authorization code to the Chase authorization server, along with your client secret. Why include the client secret? Because again, the authorization code is in the URL. So anyone can see it and anyone could try to exchange it for the access token. That's why we need to send the client secret, so Chase's server can say "Oh yes I remember I had generated this code for this client ID, and the client secret matches. This is a valid request."
And then it returns the access token. Note how in every step of the OAuth flow, they have thought through how someone could exploit the flow, and added safeguards*. That is a big reason why it's so complicated.
*I'm reliably informed by a friend in security that the OAuth designers learned a bunch of lessons the hard way, and that is another reason why it is so complicated: because it had to be patched repeatedly.
The other big reason is because we want the user to be involved. That makes it complicated because all the user stuff has to be frontend, which is insecure, because anyone can see it. And then all the secure stuff has to be on the back end.
I keep saying frontend and back-end, but in the OAuth docs, they say front-channel and back-channel instead. Let's talk about why.
Front-channel and back-channel
So, OAuth doesn't use the terms frontend and back-end, it uses front-channel and back-channel. Front-channel means GET requests, where anyone can see the parameter in the URL, and back-channel means POST requests, where that data is encrypted (as part of the POST body). The reason OAuth doesn't use frontend or backend is, because you could make POST requests using JavaScript! So, theoretically, you could exchange your authorization code for an access token right on the frontend, in JavaScript, by making a POST fetch request.
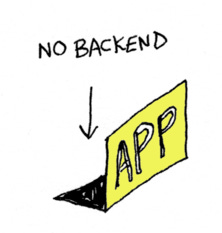
Now, there is a big problem with this, which is you also need the client secret to make that request. And of course, once the secret is on the frontend and accessible in JavaScript, it's not secret anymore. Anyone can access it. So, instead of using the client secret, there's a different way to do it called PKCE, spelled P-K-C-E, pronounced “pixie” (seriously). It's not as secure as doing it on the backend with the client secret, but if backend is not an option for you, you can do it using PKCE. So just know that if you have an app without a back-end, you can still do OAuth.
I may cover PKCE in a future post, as it is now recommended for the standard flow as well, since it helps protect against auth code interception.
Same problem for mobile apps. Unless you have a mobile app that has a backend component, like a backend server somewhere, if you're putting your client secret in a mobile app, well, anyone can get that because there are tons of tools to extract strings from mobile apps. So, instead of including your client secret in your app, you should again use PKCE to get that access token.
So those are two other terms that are good to know: front-channel and back-channel.
At this point, you've seen what the OAuth flow looks like from the user's perspective, and from the developer's perspective, and you have seen the components that make it secure.
Some final thoughts
One last thing I want to mention is OAuth can look like a lot of different ways. I covered the main recommended OAuth flow above, but some people may do OAuth by passing back an access token in the redirect instead of the authorization token (doing that is called the "implicit flow"). Some people may do it using PKCE. There's even a way to do OAuth without the user consent part, but that really is not recommended.
The other part of OAuth we didn't cover is that tokens expire and you need to refresh them. And that happens through a refresh flow. Also, OAuth is all about authorization, but some workflows use OAuth to log in, such as when you use a “sign-on with Google” feature. This uses OpenID Connect, or OIDC, which is a layer on top of OAuth that also returns user data instead of just an access token. I'm mentioning this here because when you look for OAuth on the web, you'll see a lot of different flows, and you may be confused as to why they're all different. And the reason is, OAuth is not straightforward like HTTP, OAuth can look a lot of different ways.
Now you're good to go out and do your own OAuthing. Good luck!
